I love making/using these box-pleats...if you like the look too and want to know how to do it...keep on reading.
I had to play around with my Scor-Pal and paper to get this down
right...especially since I was starting from scratch.
It's down to a science enough to share now.
First, make sure you have THICK cardstock...I use 110lb.
I was surprised to hear that paper weighed anything too. ;)
Ok...now, you'll need something to score and measure with.
It took me awhile to treat myself to a Scor-Pal.
It really does help.
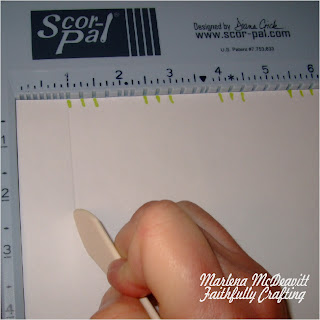
Lay your paper lengthwise so that it goes from 1"-10 1/2".
See those lines?
Don't draw them in.
I just made them visible for you, ok?
I found the easiest way to remember what I was doing,
...was to think,
"1,2,3...1,2,3...123".
Start at 1", SCORE....that's ONE.
Then, TWICE step 1/4" to the right and score each time.
1 1/4" and 1 1/2" (TWO,THREE).
Then, you hop to 2 1/2" and score (ONE).
Score at 2 3/4" (TWO) and 3" (THREE).
You should have your "waltz" recorded like this.
You keep on going until you get to the end of the paper at 10",10 1/4",10 1/2".
Now the real fun begins. ;)
If you want to trim it shorter, now is the time to do it, before you start creasing.
Trust me...it really is the best time.
If you decide to trim later...it's still doable...
but you'll have bendy pleats.
Fold at the first and third lines this way...skipping the second for now.
Now you will make the "valley".
Now, crease.
You can see it started to form.
Keep on going until you have this.
But, without the green lines. ;)
Once you get the hang of it...you can decorate it.
It's best to stamp it BEFORE scoring.
Keep on going until you have this.
But, without the green lines. ;)
Once you get the hang of it...you can decorate it.
It's best to stamp it BEFORE scoring.
Hope you were inspired to try this technique.
Thanks for stopping by~ it's always a pleasure. ;)


No comments:
Post a Comment